Substitution Tiling
The diagram below shows one way how pattern block shapes can be used to create larger shapes.
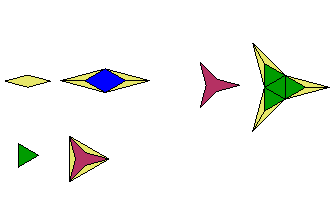
In the first row, a beige diamond is "grown" to a larger diamond with the same proportions. The new diamond uses beige half-diamonds and a blue diamond (which is the same shape as two green triangles). The first diamond is called D0 and the second is D1.
In the second row, a green equilateral triangle is "grown" to a larger green equilateral triangle. The larger triangle consists of beige half-diamonds and a Y-shaped star. ). The first triangle is called T0 and the second is T1.
In the third row, a Y-shaped star is "grown" to a larger Y-shaped star with the same proportions. The new Y uses beige half-diamonds and green triangles. ). The first Y-shaped star is called Y0 and the second is Y1.
In all of the transforms the following are important:
- The edges of all transformed pieces are the same length as each other, i.e. the long diagonal of a beige half-diamond.
- The set is closed, i.e. the transformed pieces consist of only the original shapes.
Next Iteration
The following diagram shows how these new pieces can be grown into larger pieces.
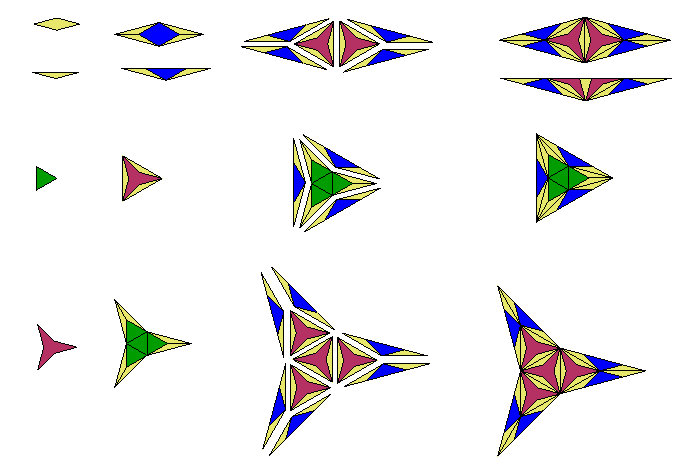
The first row shows a beige diamond (with the half-diamond) grown into the larger beige diamond previously shown. Then it shows how these larger pieces are put together to create an even larger diamond. This new diamond is called D2.
Notice that D1 and T1 are put together to create T2 in the same way that the original pieces D0 and T0 created D1.
The second row shows a larger triangle called T2, and the third row shows a larger Y-shaped star called Y2.
Again, for these new shapes, the following is important:
- The edges of all transformed pieces are the same length as each other, i.e. two edges of the beige diamond plus the diagonal of a blue diamond.
- The set is closed, i.e. the transformed pieces consist of only the original shapes.
In the grown pieces above notice that all the beige half-diamonds are adjacent to other beige half-diamonds. So the only half-pieces really needed are at the edges of the designs. Internally whole pieces can be used.
Using Whole blocks
When I use pattern blocks to create the designs I don't use half pieces. Therefore the edges are not straight as shown above. The following diagram shows how whole pattern block pieces can be used to create the next bigger beige diamond, called D3.
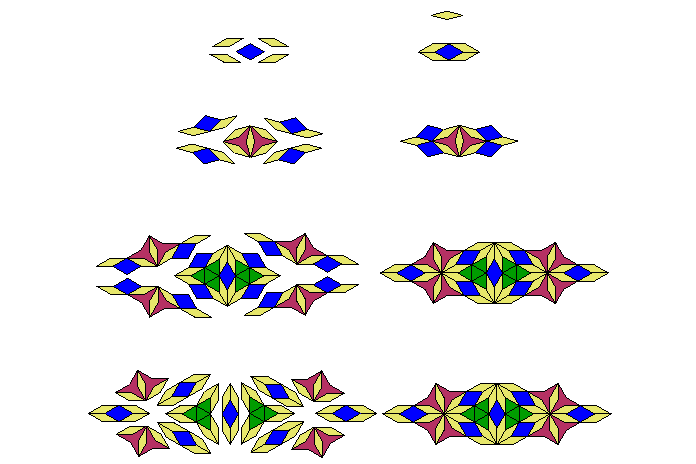
The diagram shows the diamond D0 in the first row, creating D1 in the second row and D2 in the third row.
The diagram shows two ways to think about how D3 is created.
In the fourth row, pieces D2 and T2 are put together the way the shapes in D1 are put together. So it is easy to see that this process can be continued to create larger diamonds.
In the fifth row, pieces D1, T1 and Y1 are put together the way the shapes in D2 are put together. So you can think about the operation of taking any pattern and creating a larger shape as transforming the pattern by replacing all the shapes D0, T0 and Y0 by grown shapes D1, Y1 and T2.
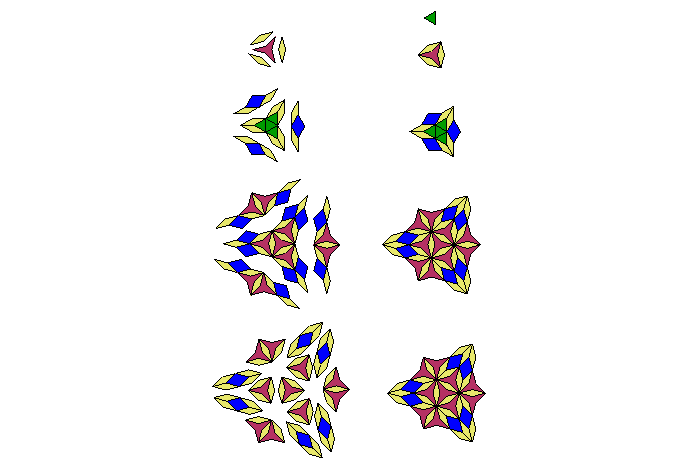
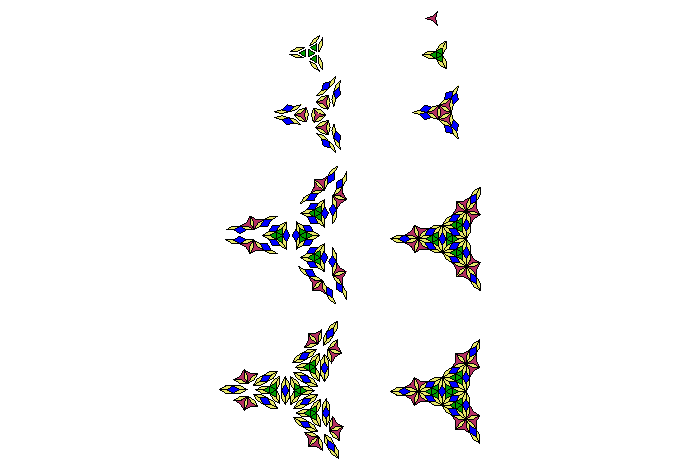
The next two pictures show using whole pattern block pieces to create T3 and Y3.
Transforming Other Shapes
The previous diagrams showed how a closed system can be created. This closed system has a property that, between each iteration, pieces are scaled by a certain factor.
Other pieces besides those shown above can be scaled. For example, in the same system, the following diagram shows how the square can be scaled.
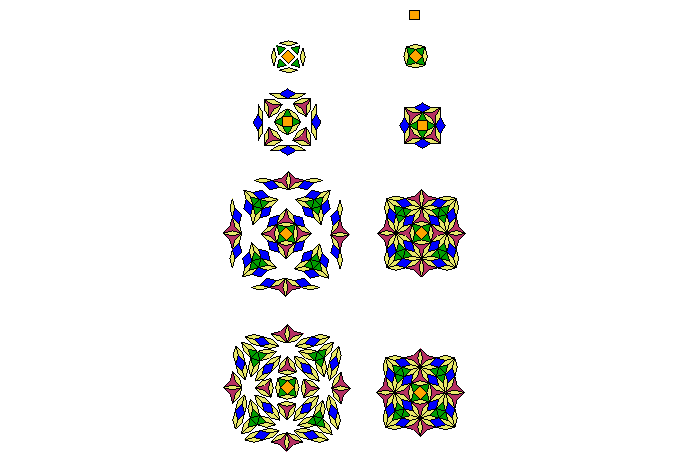
The diagram shows how square S0 can be scaled to create squares S1, S2 and S3. This is done by creating a transformation for the square, and then using the square's transformation and previous transformations of the diamond, Y-shaped star and triangle to make larger squares.
Copyright 1998-2004 by Jim Millar